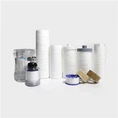
CTO activated carbon block filter cartridges should be installed after pre-filter cartridges such as PPF, with the water flow direction aligned with the arrow on the filter housing. Ensure a tight seal after installation. Its core function is to deeply adsorb residual chlorine, odors, and organic matter. Your attention to the installation of activated carbon filter cartridges demonstrates a high standard for drinking water quality, which is commendable.
Installation Sequence: Follow the principle of "coarse filtration first, then adsorption."
✅ Correct Sequence: PPF → CTO → Subsequent fine filtration (such as RO membrane/UF membrane)
❌ Incorrect Sequence: Placing CTO before PPF will cause large particles of impurities to quickly clog the activated carbon micropores, leading to decreased adsorption capacity, a lifespan shortened by more than 40%, and potentially causing carbon powder shedding and secondary pollution.
📌 Analogy: Just like sweeping the floor before mopping, PPF is responsible for "sweeping away" dirt and rust, so CTO can focus on "mopping away" chemical contaminants.
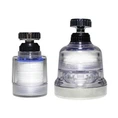
Installation Position and Direction: Precise positioning is crucial to avoid reverse installation.
1. Installation Position
* Install after the PPF cotton filter cartridge as a second-stage pretreatment stage;
* Located before the reverse osmosis membrane or ultrafiltration membrane to prevent residual chlorine from damaging the RO membrane.
2. Water Flow Direction
* The filter cartridge housing is marked with an arrow →. The arrow direction must be aligned with the water flow direction (pointing towards the outlet);
* Reverse installation will cause a short circuit, significantly reducing filtration efficiency.
3. Interface Sealing
* Check that the O-ring is intact and correctly embedded in the groove;
* Use a wrench to tighten the filter housing moderately, avoiding overtightening which could cause cracking or leakage.
Installation Steps: Five Steps to Replace the Filter Cartridge
1. Close the Inlet Valve and Release Pressure
Close the valve at the front of the water purifier and open the faucet to release the pressure in the pipeline.
2. Remove the Old Filter Cartridge
Use a special wrench to unscrew the filter bottle and remove the expired CTO filter cartridge.
3. Clean the Inside of the Filter Bottle
Rinse the inside of the filter bottle with clean water to remove deposits and carbon powder residue.
4. Insert the New CTO Filter Cartridge
Confirm that the filter cartridge is undamaged and install it into the filter bottle in the correct orientation.
5. Reinstall and Rinse
Reinstall the filter cartridge, slowly open the inlet valve, and rinse at a low flow rate for 10–15 minutes until the water is clear with no black water or foam.
Special Reminder: Slight carbon powder may appear during the first rinse, which is normal and will disappear with continued rinsing.
Usage and Maintenance Recommendations
* Replacement Cycle: Generally 9–12 months. If the residual chlorine content of the raw water is high or the water quality is poor, it is recommended to shorten the replacement cycle to 6–8 months.
* Do not wash and reuse: CTO is a disposable consumable. Washing cannot restore its adsorption capacity and may easily cause structural damage.
* Anti-dry-burning protection: After replacement, be sure to purge all air to avoid damaging the booster pump by running it dry.
https://www.angefilter.com/